Technical 03: Using Crypto
Cryptography, one of the domains of hacker obsession and self-directed study! In this assignment we will take a quick trip back in time to explore one of the most important cryptographic tools of the early 1990s, Pretty Good Privacy (PGP), which popularized crypto by making it freely available to curious personal computer users. Before we get started, though, we need to cover some of the basics.
Ciphers 101
How we do "hide" the contents of a particular message? Turns out, this is an ancient question connected with the art of government (and diplomacy). When you first approach the topic, say, by reading a classic book such as "Applied Cryptography" by Bruce Schneier, you learn about very simple "ciphers" that can be used to hide messages in strings of text (and numbers) that appear random to the untrained eye.
An ancient example is the "Caesar cipher" which consists in basically deciding on a "shifting order" and, then, proceeding to substitute letters. This is how it goes:
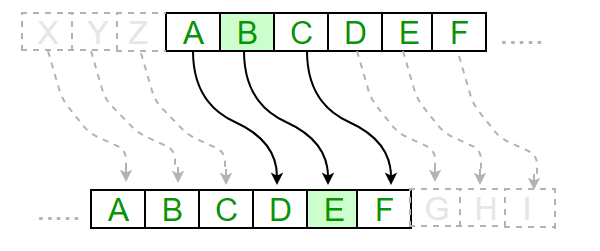
Let's say we want to write the secret message "FREE KEVIN". We need to decide first on the parameters of letter substitution. Let's say we want to substitute every letter for the 3rd letter in the alphabet, not counting the letter we start from and shifting right. The Caesar cipher would encode our message in this particular way: F becomes I, R becomes U, E becomes H, so on and so forth. Our final message then becomes: IUHH NHYLQ". The "Caesar cipher" is fundamentally a cryptographic algorithm: it describes the steps for encrypting and decrypting messages in a particular way. Simple enough thus far, right?
Public-Key Cryptography
OK, this is cool, but... it is too easy to crack! Yes, we do not even need a computer... that performs blazing fast computations to help us. There are "weak" ciphers, like Caesar's, and "strong" ciphers that generate encrypted content that is difficult to break.
The art of "cryptology" (the study and development of cryptography in applied mathematics) has advanced to design and implement ciphers that are meant to be resistant to computational attacks (or, at least, to make it impractical for us to use computers to break a cipher). Let's see what this means in practice.
One important development in the history of cryptography was the invention of "Public-Key Cryptography" in 1976 by the mathematicians Whitfield Diffie and Martin Hellman. Public key consists in generating two cryptographic keys, a public and a private one. Let's say Alice and Bob need to share a secret over an hostile Internet link (let's assume that every Internet link is hostile, given what we know about computer security today):
Once we create a key pair, we can use Public-Key Crypto by distributing a public key and keeping our private key in secret. Every time we want to cipher something (a file, a text, an email, etc.) we can use the public key to generate the encrypted version of the data. Every time we want to decrypt the file, we need to use the private key to de-cipher. See below a simplified schema:
You are now starting to understand the rationale behind all of this: private keys need to be kept secure, whereas public keys must be given to every one (or every computer) that might need to send you something that only you (let's repeat, "only you") can decipher! This is called "assymetric" cryptography (because it depends on two different keys).
Enough theory! Let's yield to the "hands-on imperative" and use PGP or, better, one of its free implementations called GPG (GNU Privacy Guard), which uses the OpenPGP standard. PGP is "ancient" history, but we have modern implementations to use and enjoy. Let's get to it.
Activity #1: Key Pair Generation
Our first challenge is to generate the key pair, which is not really a challenge but we want to sound dramatic!
We will generate a key pair by using our old friend: the terminal. Yes, you may dislike it at this point, but it helps us look under the hood and see what is happening behind all the bells and whistles of the graphic interface of our computers. Hackers always use terminals in their exploratory studies.
Here are the steps to complete this first challenge:
1. Download and install GPG for your operating system (Linux, Mac, Windows, Unix).
2. Generate the "key pair", following the orientation below
Step #2 is a bit involved, but again, the terminal is your friend: it will tell you exactly what is up through a convenient, text-based menu.
Generating your "key pair" is as simple as:
- Opening up a terminal
- Typing up this command: gpg --full-generate-key as shown below:

After you type the command, the program will continue to ask you questions to complete the generation of your key, as shown below:
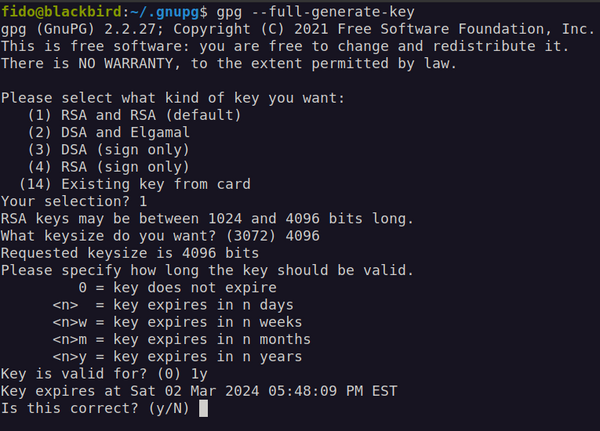
It will ask you a few questions that are super important:
- What cipher you want? You will pick the RSA cipher for public and private keys by selecting option 1
- How big should the key be? You can pick the maximum size of 4096 bits (it would take thousands of years to break a key of this size, unless, some theorists argue... we develop quantum computers in the near future)
- When should the key pair expire? It is good practice to recycle your keys often (depending on your use-case), so let's pick 1 year (type 1y and press enter)
You will now proceed to add your personal info to the key pair: people need to know the key belongs to you, so they can avoid ciphering a secret message to someone else! Here are the following prompts:
- What is your name? Type it up.
- What is your email? Adding a functional email address is important, if you want to use it for email encryption. Email is also important to identify the key faster, if you publicize the key
- What is your password for the private key? The program will finally ask you to create a "passphrase" to protect your private key in your computer drive. You definitely do not want people to have "clear" access to the private key... even it is inside your own computer. So, pick a password or passphrase and press enter.
After all this mandatory info is in, you will see the follow output in your terminal: you have successfully created your key pair!
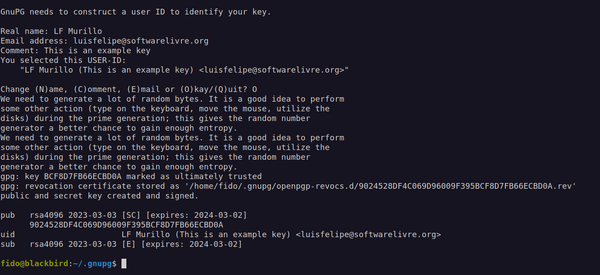
Super! Keys have been generated and stored on your computer. Your public key is open for anyone to see, but the secret key is protected with another layer of encryption, so you need the password you generated above to unlock it.
Let's generate an external file for your public key, so you can share with Ellen and your friends with the following command: gpg --armor --export YOUR_EMAIL > YOUR_NAME.pub (substituting, of course, YOUR_EMAIL for the email you used, and YOUR_NAME for the 'real name' you typed up.
Great job! You are now ready to start sharing your public key with anyone who might want to send you encrypted data!
Let's move on, since there is much more to learn.
Activity #2: Generate an encrypted message
OK, so... this is a lot of work: how do we actually use GPG? Well, that's the easy part: you just need to tell GPG that you want to encrypt a particular file and it will output an encrypted version of it. Simple as that.
But, wait... you will remember that we are using public-key crypto. So, you need to specify the recipient of your file and, most importantly, you need to use their public key otherwise you won't be able to proceed! Remember Bob and Alice: they possess a secret that is only shared between the two of them (and protected by GPG). They possess different parts of the puzzle, so to speak.
In practice, this is how it goes: you will pick any file, let's say a text file with some secret message... that only your recipient should be able to decrypt. We will take two steps:
- We will import the keys of the recipient into the GPG program (in our case, we will import Ellen's public key to be found here)
- We will encrypt a message (for Ellen)
First, we want to download Ellen's public key, which can be obtained here.
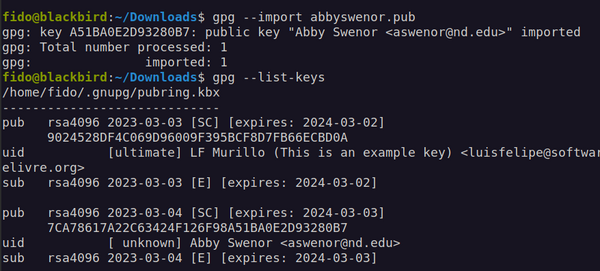
Once you have the pub key of your recipient, let's import into GPG with this command: gpg --import NAME_OF_THE_KEY.pub as shown below. You can also list all the keys in the system, just to make sure everything is good by typing: gpg --list-keys
Cool, we can know use Ellen's pub key to generate a ciphered message to her! Let's send her a super secret text message that says: "Thank you, Ellen, for all the help with everything!" and then cipher it, so only Ellen can read it. The command is: gpg --output text-to-encrypt.gpg --encrypt --recipient ejoyce3@nd.edu text-to-encrypt.txt (whereas 'text-to-encrypt.txt' is the file you created with the secret message)
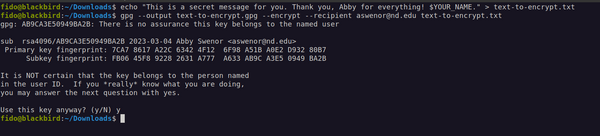
Ah ha! There is something going on above: the program is telling us that the key is not validated, which means it has not be identified or signed by you as a key that you trust. We will explain the matter of "trust" below, but let's move on for now.
To make sure you got this right, try to read the content of the file with the secret message and this is what you are going to see:
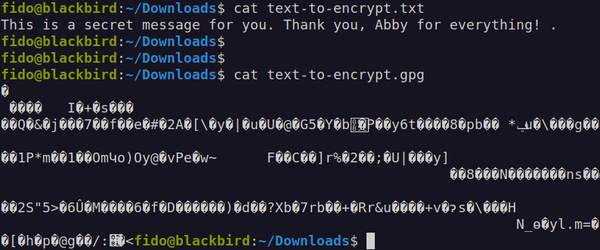
That's it: your message in clear text, but also ciphered! It is impossible to read and that is exactly what we want.
You are now well-versed in the art of encryption, but we have yet another activity for you.
Activity #3: Signing a file (so people know it came from you)
You are almost ready to submit your assignment. We just have one more activity that will be very helpful for you in the future.
When using PGP, you need to learn about digital signatures, or more specifically, how to digitally sign a file so people know it was generated by you. For doing so, you need to pick a file and pass it to GPG, telling the program that you want to digitally sign the file. Let's pick a text file, so we can include our signature inside of it for convenience. Here is how to do it:
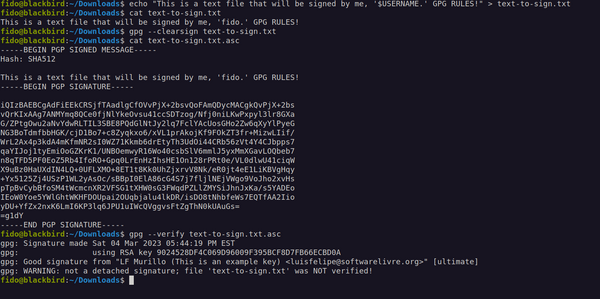
You will basically type the following command on the terminal: gpg --clearsign text-to-sign.txt (whereas 'text-to-sign.txt' is any text file that you might want to sign). GPG will generate a copy of the file you passed and append the .asc termination (in this case text-to-sign.txt.asc) containing your signature as you can see from the image above.
And... voila`! You have now a signed text file that demonstrates that you are the one who created it. Most importantly, you have everything to submit as part of your assignment. Neat.
If you are keen on exploring GPG further, we have some extra credits for you. You can keep reading the next section or skip to the bottom of this page, where we describe how to submit the assignment. It's up to you!
A Few Words on Public Key Identity
You may wonder: how secure is this, given that anyone can create and circulate a public key in the name of anyone? We could type anything, like "Steve Wozniak" (woz@apple.com) and, boom, we can have people sending us messages that are not meant for us to read, but for the real Woz. You saw above that GPG will complain if the keys have not being properly signed: nothing guarantees that people are who they say they are. You know, on the internet nobody knows there is a dog on the other side of the line.
This problem has been carefully considered by the expert community around PGP and OpenPGP (the standard). The solution, interestingly enough, is not technical but social: keys need to be vouched and validaded by members of a community in something called a "Web of Trust". Here is a graphical representation of the concept:
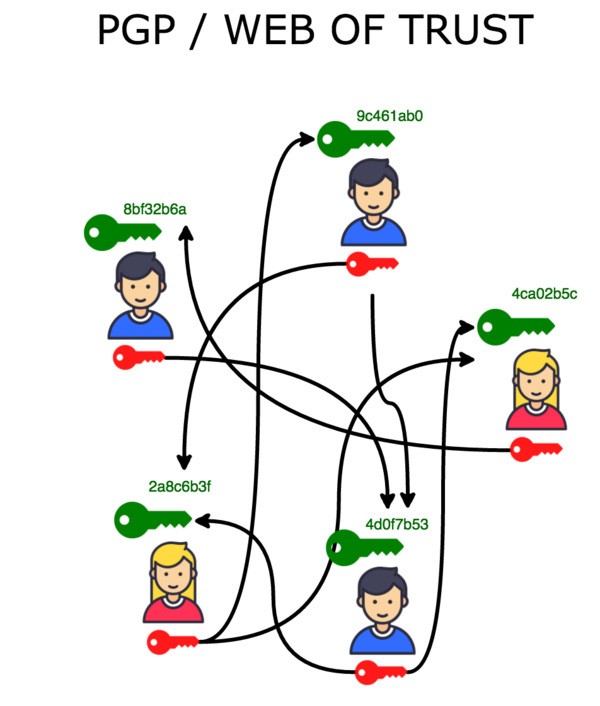
To create the Web of Trust, people come together with folks they know, but also with folks they do not know in the context of a particular community (say, the Linux community) in something called "Key Signing Party". At these parties, people exchange keys and sign each others' keys. Here are the common steps of a "Key Signing Party":
- Publish your key (by pushing it to something called a "key server" that keeps tons of public keys)
- Print your key on paper or, better, put it in your business card. You also need to add: first name and last name, your e-mail address (the one you use with the key), and your GPG key "fingerprint" (which is convenient for finding you)
- Exchange the key with another person
- Verify the identify of this other person
- Use GPG to sign the key of this person
- Upload your signature to the "key server", completing the process of key signing
Interesting, uh? After all of these steps keys will have been exchanged, validated, signed, and uploaded to a public key server, so everybody will be able to see that you know the person that owns that particular key. From now on, you can send encrypted messages and files to the person easily with confidence that they are who they say they are... unless, of course, their private key gets compromised!
In the event of a private key that gets compromised, it is important to revoke the key pair so it can stop being used.
Extra Credit Challenge
We know you all love a good challenge!
For extra credit, you will send an encrypted email to your instructors using their public keys. Not very hard, but a bit time consuming if you do not have an email client set-up and have never done this before. Here are the fingerprints and respective public key files for your instructors
[LF's pub key], email: luisfelipe@ucla.edu
[Walter's pub key], email: walter.scheirer@nd.edu
[Ellen's pub key], email: ejoyce3@nd.edu
To succeed in this challenge, you just need to configure our email client to use your GPG identity. Then, you need to import the public keys of the people that you need to communicate with. If you succeed in configuring your email client, you will have accomplished something quite important: you will have converted an email (which is fundamentally an electronic postcard, anyone with backend access can read) to a confidential correspondence!
Grading
You must submit the files to prove that you completed Activities #1, #2 and #3 in this assignment. The first two activities are worth 20 points each. Activity #3 is 10 points. The extra credit challenge is 10 points. You will be graded in terms of the following criteria:
- Was the public key pair generated successfully and shared with Ellen for Activity #1?
- Can Ellen open the file ciphered for her on Activity #2?
- Can we validate the signature on the file that was sent to Ellen for Activity #3?
- For extra credit, can the Instructors open the email that was ciphered for them?
Submission Instructions
Place your public key, the file you encrypted, and the file you signed in your Google drive folder you previously shared with Ellen.
- Name the public key file using this convention: lastname_firstname_duedate.pub Example: Joyce_Ellen_031924.pub
- Name the file you encrypted for Ellen using this convention: lastname_firstname_duedate.GPG Example: Joyce_Ellen_031924.GPG
- Name the text file you signed using this convention: lastname_firstname_duedate.txt.asc
Ellen will collect each file directly from your drive after the due date.
Happy ciphering the world!
(please remember: strong crypto comes with strong responsibilities!)