Technical 02: Surfing Internet Ports
Examining Network Protocols With Netcat
In each technical homework, you will be given well-defined programming and/or digital artifact analysis tasks that involve the use of vintage technologies that have had a major impact on today’s technology. Technical homeworks are designed to be accessible to students from any discipline, with requisite knowledge being provided to you in class and/or in the assignment in advance of the due date. These assignments are usually due by 5pm on Tuesdays of the following week they are assigned. This technical homework is due on 2/27 at 5pm.
What Does the Internet Look Like Behind the Scenes?
Now that you've learned a little bit of programming and have cut your teeth on video game hacking, you're ready to turn your attention to understanding how computer networks work. If you can learn a bit about the TCP/IP protocol suite, the language the Internet speaks, you'll be in good shape for exploring the most expansive global information network there is.
Behind each Internet service is a port, which is an interface between the network and a piece of software running on the server providing that service. In the network security portion of this class, we will learn quite a bit about ports, including how to scan for them and exploit the services they expose. But for now, let's get our feet wet with a small exercise that reveals some of what goes on behind the scenes of popular Internet services like the web.
When you connect to a particular service on the Internet, the client program you use doesn't have any sense of the human-readable name of that service. It connects to a numbered port for that service. For instance, if you use your web browser to view an encrypted site (which many sites are these days), you're connecting to port 443. It possible to connect more directly to these numbered ports through the use of a low-level networking tool typically favored by system administrators.
Netcat – The Swiss Army Knife of Networking
The netcat tool is a standard Unix network utility that is useful for many tasks, including opening raw connections to arbitrary ports. It began life as an underground security tool developed by the hacker *Hobbit*, who released it in 1995. It has since been ported to number of different platforms, and now runs on all major operating systems. Your first task to either verify that netcat exists on your system, or install it if you do not already have it. It is a command line tool named 'nc' on most systems.
If you are running Linux: It is available on most Linux distributions by default, but can be installed on a Linux native install or virtual machine running on your own computer if it isn't using your distribution's package manager. You can run it by opening a terminal and running the command: nc. If it is available and working, you will see some instructions from the program as output.
If you are running MacOS: It comes with netcat installed as of version 10.13. You can also use MacPorts to install a variant if you don't have it installed in a very old version of MacOS or if you want to experiment. You can run it by opening up a terminal (go to your Applications Folder, then the Utilities Folder, and then click on the 'Terminal' program) and running the command: nc. If it is available and working, you will see some instructions from the program as output.
If you are running Windows: This process can be slightly more involved than for the other two operating systems.
-
Temporarily disable Windows Defender (follow the steps listed here: https://support.microsoft.com/en-us/windows/turn-off-defender-antivirus-protection-in-windows-security-99e6004f-c54c-8509-773c-a4d776b77960 )
-
Download: nc.exe from this github repository (https://github.com/int0x33/nc.exe/blob/master/nc.exe)
-
Open your command terminal (instructions here if you need them)
-
Switch to the file location of nc.exe: cd C:\Users\USERNAME\Desktop\netcat\ (This could be another file location depending on where you saved it)
-
Use the netcat command by using the command: nc
-
If it is available and working, you will see some instructions from the program as output.
For a more detailed step-by-step tutorial or more information on the netcat command, check out this website: https://www.ionos.com/digitalguide/server/tools/netcat/
For all operating systems: To connect to a remote port, the following syntax can be used from the command line: $ nc <host> <port>
Web Servers
Let's start by considering a typical web server. The first port we want to surf is Notre Dame's web server. We can connect directly to nd.edu port 443 using netcat and then issue the raw HTML command 'GET / HTTP/1.1' to get some information a web browser won't typically print:
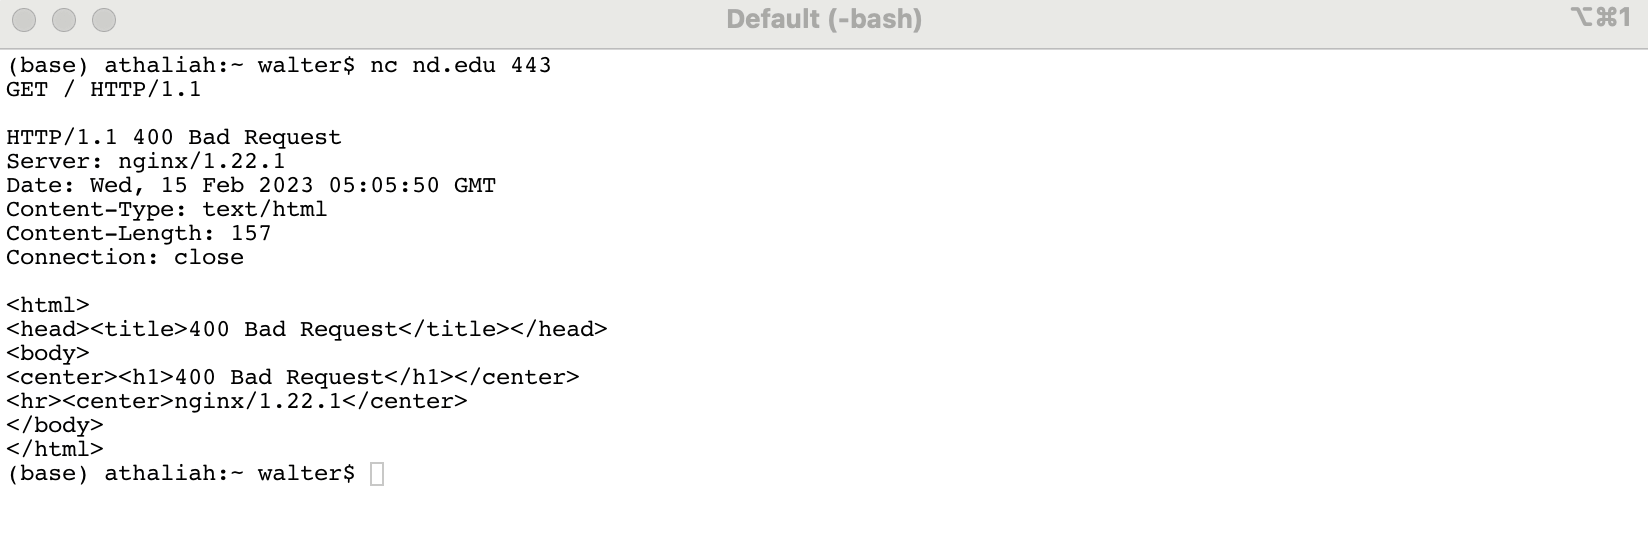
Note that we don't get any output from the server when we first connect. Entering the command and then pressing enter a few times results in the response we're after. As can be seen in the terminal window above, the server happily told us what software it's running: Nginx version 1.22.1. It did not matter that the server had some trouble interpreting our command, it still returned useful information. Knowing such information helps us understand the particular configuration of the server, and what vulnerabilities may be present.
Activity #1: now that you have seen how to connect to a web server and issue raw HTML commands, use netcat to find out what web server another university of your choosing is using. Feel free to search the web to better identify the server string returned. Include the output of your command in your answer.
SSH Servers
Other services are even more helpful in providing information behind the scenes. One example is the Secure Shell (SSH) remote shell service, which is used to remotely connect to servers for interactive use. SSH runs on port 22.
Activity #2: use netcat to connect to the SSH port of this server: www.thecvf.com. What operating system is this server running? Again, feel free to search the web to better identify the server string returned. Include the output of your command in your answer.
FTP Servers
Some ports provide more interactive interfaces through direct connections with netcat. This is especially true of legacy services like the File Transfer Protocol (FTP) that was commonly used to transfer files to and from servers on the Internet before the advent of SSH, which also has file transfer capabilities. It runs on port 21.

Activity #3: use netcat to connect to the FTP port of this server: ftp.dlptest.com. A successful connection should provide the 220 response above. Figure out how to log into this server (don't worry about getting into trouble, it's a public site). Searching the web for information about this particular server will be helpful. A list of valid FTP commands, including ones related to logging in, can be found here. After you've logged in, demonstrate that you have access to the server by issuing some other commands. Include the output of your session with this server as your answer.
Mystery Server
Activity #4: use netcat to connect to gatewaymud.org on port 6969. What is this server? Explore it for a bit and explain what you discover as your answer.
Extra Credit
Connecting to ports by hand using netcat is not the most efficient way to find out what software a particular server on the Internet is running. This extra credit activity is an opportunity to explore the use of the nmap network scanner (introduced in lecture on 2/15), which has a multitude of useful features for network reconnaissance. Installation and usage instructions can be found on Fyodor's website insecure.org.
Extra Credit Activity: Use nmap to profile a host. We want to know the 1) operating system, 2) list of services that are available; 3) list of ports the services are running; 4) list of ports that are being filtered. Pick an interesting host to be profiled (that is, a host that is offering several Internet services). If you describe 1-4 on an interesting host, you will get your extra credit points.
Grading
You must submit answers for all four of the activities in this assignment. The first two activities are worth 10 points, and the last two are worth 15 points, and will be graded in terms of the following criteria:
- Does the output of the program match the expected output for Activity 1, 2 and 3?
- Are the servers correctly identified in Activity 1 & 2?
- Does the description of what was discovered in Activity 4 match the purpose of the target server?
The extra credit activity is worth an additional 10 points.
Submission Instructions
-
Place your output / answers for each of the four questions into a plaintext file that will be saved in the Google drive folder that you previously shared with our TA Ellen for the first writing reflection
-
Name your plaintext file using this convention: lastname_firstname_duedate. Example: Joyce_Ellen_022724.txt
-
Ellen will collect each assignment directly from your drive after it is due