Technical 01: Game hacking
Video games have always been an obsession in hackerdom. One of the most famous early hacks involved programming a game called "Space Wars!" on a PDP-1 by the same crowd of early hackers we read about in Steven Levy's (1984) book "Hackers." We are going to dedicate an entire lecture to examine that aspect of hacking, so let's not jump ahead of ourselves.
This assignment provides you with a little intro and a little exercise on the art of "game hacking." It is known that many hackers had their introduction to hacking in the 1980s and 1990s through the innocent practice of modifying video games. Over time, this innocent practice led to profitable products such as the "Game Genie," a game modification device that allowed players to change the number of lives, scores, and other aspects of the game. Game hacking has also led to a long tradition of console hacking, where a lot of technical knowledge about video game systems (old and new) has been shared online.
In the following technical homework, you will get a taste of "game hacking" by modifying a game of your choice for the Nintendo Entertainment System (NES).
This technical homework is due on 2/13 at 5pm.
What is inside a Nintendo game cartridge?
Before we had speedy Internet links to download and play (very large) games on our computers or video game consoles, it was common for us to load games from different types of media (such as diskettes, cassette tapes, cartridges or CDs). Here is an example of a cartridge that was very important in the history of the NES console: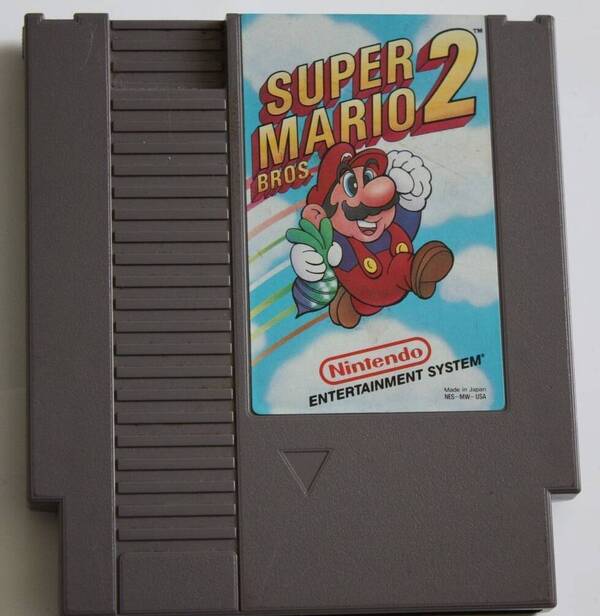
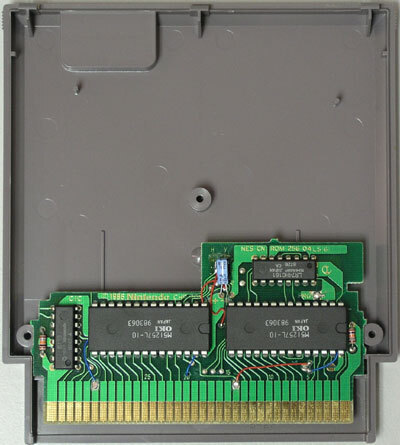
By inspecting old Nintendo (NES) game cartridges, we usually find two important chips inside. These two chips are marked in the purple NES CART PCB below (printed circuit board) as CHR and PRG: respectively Character chip and Program chip. These are "Read Only Memory" chips (ROM, that is, only used to be read by the video game system, not to be used for writing data). There are more complex game cartridges, but we do not need that level of detail just yet.
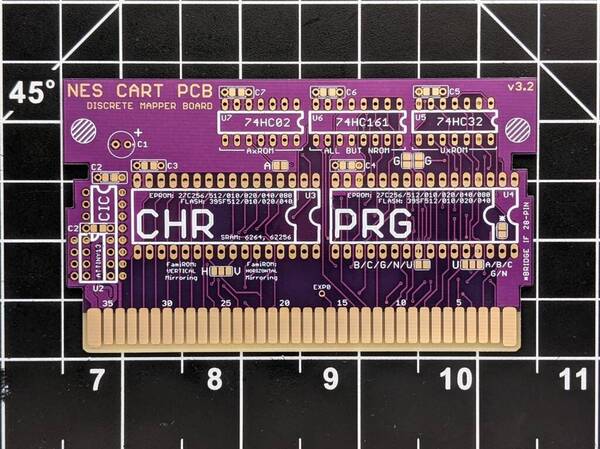
(Image source for the beautifully designed and unpopulated PCB: mousebiteslab.com)
What are these two chips exactly for?
Basically, the CHR (Character) chip contains the data about all the characters and graphic elements of the game (making up "sprites," that is, those blocky, but neat graphic elements you see moving on the screen). This data is used to generate all the visual aspects of the game. The PRG (Program) chip contains the code of the actual game. The game code executed from the PRG chip reads from the CHR chip all the graphic elements and texts to be displayed on the screen.
Here is roughly how things are organized inside the NES architecture. There are also two main chips inside the game console that are responsible for processing data (CPU, Central Processing Unit) and another for processing graphics data (PPU, Picture Processing Unit). Don't worry about the technical details, we will not be asking you about them!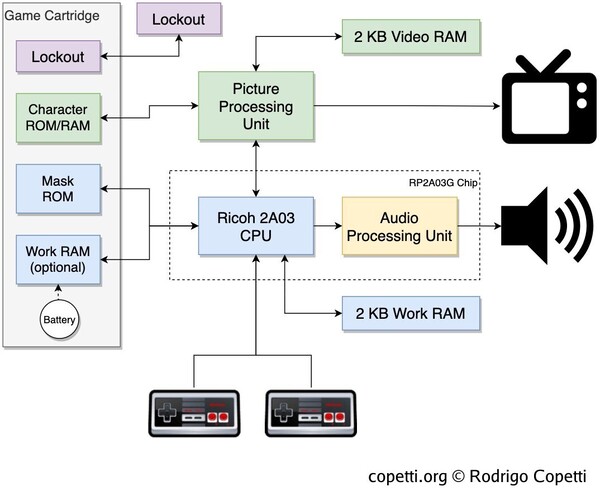
Let's not forget that you are still a very young hacker (hypothetically and for the purposes of this assignment). You are more interested in gaming than in the engineering details. You learned a bit of BASIC and have started to program your own adventure game. Now, you are interested in digging a bit deeper into what is called in computerdom the "low level" (that is, the level of processing where instructions to computers are encoded). You are in love of your NES game "Mario Bros 2" and you heard from a classmate that you can actually make modifications to the code of the game to do all sorts of fun things. Your classmate told you it is fairly easy to change the text of the game to include your name, for example. That's neat. Here is something that you can try for yourself.
Game hacking challenge
Your mission is fairly simple, it involves the following steps:
- Pick a game from the NES library to modify;
- Load the game on the NES emulator and play for a bit;
- Next, load the game onto a "sprite editor" to read the content of the CHR chip;
- Make modifications to the PRG code using a hex editor---after identifying the memory area with the text you want to modify;
- Save your modification to a NES file and test the file on the emulator.
Because the Internet is (also but not only) full of amazing people who learn from each other (remember the values of hackerdom of information sharing and hands-on practice), we can find web-based implementations (in Jabbahscript) for all the tools we need for the job! So, let's roll up our sleeves (or... maybe not... because it is snowing outside).
Step #1
You will follow this link and download a game that you want to modify!
Step #2
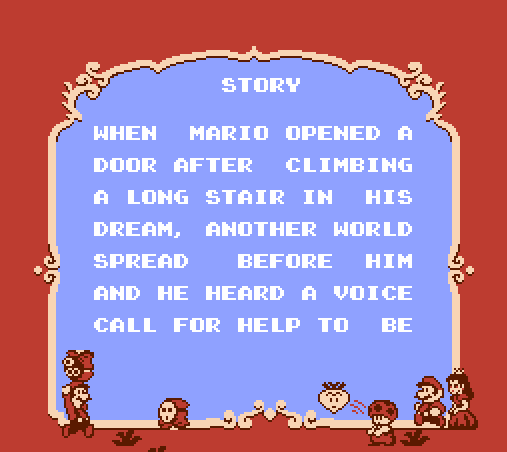
Before you continue with the mission, you may want to play the game for a bit to identify the text that you may want to modify. The sooner you identify the text the better, though, because you do not want to search further down the PRG (Program) code to make modifications. For our tutorial, we will pick Mario Bros 2 and modify a title screen! Simple enough. The tile screen comes very soon as you load the game.
You will follow this link to open the NES emulator program. Click on "Browse..." and select the file (.NES) you downloaded during step #1. You should be able to play and pause where you see the text you want to modify. Here is an example screen with text we identified for modification after the game has been loaded:
To play the game you must use the keyboard. Here are the commands:
- Start game: Enter
- Pause game: Enter
- Left, Right, Up, Down: Keyboard arrow keys
- Button A: Keyboard letter "Z"
- Button B: Keyboard letter "A"
Gaming is super fun, but... don't get too distracted, we need to finish the mission!
Step #3
You have identified the text you want to modify in the game, say... the text of the intro of the game as shown in the picture above. The second step is to actually identify the code for each character in the CHR memory. As explained above, the characters and graphics for the NES game are situated in the CHR chip. You can actually read the content of the CHR by using the application from this link.
Once you open the link with the tile editor, you need to click on "Browse..." and select the same .NES file you loaded on the emulator application above. The file will load and you will be able to see the contents of the CHR. Here is an example:
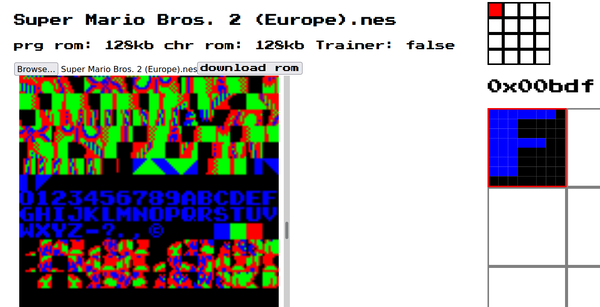
Important: please note that if "CHR rom" is listed as "0 kb", the CHR content might actually be located inside the PRG code (some game cartridges are different as we mentioned above). In this case, please pick another game... and load again until you find the content of the CHR as shown in the image above.
The next step is for you to create a lookup table of the hexadecimal codes for the characters (in the actual alphabet). Scroll down on the content of the CHR until you find an array of letters. Click on them and the editor will show you the hex for each one of them. You will copy the last 2 characters. For instance, 0 is d0; 1 is d1... G is e0; space is f9.. you get the idea. Finally, our table for Mario Bros. 2 will look like this:
| char | hex |
|---|---|
| A | DA |
| B | DB |
| C | DC |
| D | DD |
| E | DE |
| F | DF |
| G | E0 |
| H | E1 |
| I | E2 |
| J | E3 |
| K | E4 |
| L | E5 |
| M | E6 |
| N | E7 |
| O | E8 |
| P | E9 |
| Q | EA |
| R | EB |
| SPACE | F9 |
You get the idea: a whole lookup table needs to be created if you want to modify big chunks of text. For this example, we will stick with just a single name: changing "Mario" to "Felipe." Innocent and easy enough. Let's move on to the next step.
Step #4
Now you have the lookup table, it is time to go hunt for the strings inside the actual program of the game in binary format. The main trick here is that binary notation is too complicated for us to memorize (too many digits, little variation...), so the hexadecimal notation is the standard for dealing with low-level programming. If you are a computer science or engineering major, you already learned or will learn how to convert between decimal (base 10), binary (base 2), hexadecimal (base 16) notations. If you are not, there is no problem. We will not ask you to learn! You just need to bear with us for a minute. It will be fun, we promise!
For programming computers at the low level, we use hex (base 16) because it is more convenient (than binary and more economic than decimal). Here is a primer on how to convert from decimal to hex, and then from hex to binary. Again, you do not need to memorize this for now.
You will open the file you downloaded (.NES) into an hexadecimal editor by following this link. Click on "Open File" and load your file. You will see this screen:
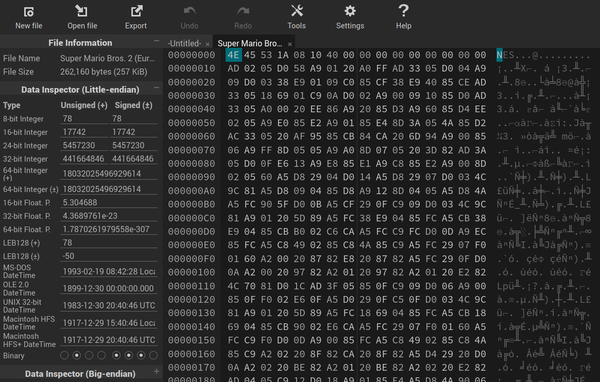
Notice that the only thing you can actually read is the occurrence of three letters for NES: they are encoded in ASCII and identify every game for the system. Everything else is impossible to read. That is normal... we are interested in the hex encoded information in the middle column.
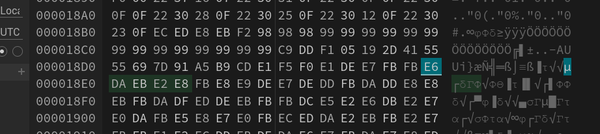
What we are going to do next is to search for the string that we identified in the title screen of the game we want to modify. The goal is to change MARIO to another name. According to our lookup table, the code for MARIO would be (M=E6, A=DA, R=EB, I=E2, O=E8). Easy enough: select the "Search" box and type the code: E6DAEBE2E8. The hex editor will highlight where in the code the text is... so you can proceed to modify the code directly. Here is how the highlight will appear on your screen:
Awesome! Now, we just need to type in directly the code for the letters we want to modify. We may want to substitute MARIO for SPOCK or whatever. We will substitute for FELIPE because those are some of the letters that we memorized (high up in our lookup table). You can pick any name... but here is how to say FELIPE: F=DF, E=DE, L=E5, I=E2, P=E9, E=DE. Be mindful of the space allocated for the characters. The bytes around the text tiles represent other elements of the code. If you modify them, you might break the Program ROM. If you do so, it is all good: you just have to start again, because your game will not load.
Step #5
You are now done, or... almost done! You can export your modified NES file from the hex editor by clicking on "Export."
To make sure everything works, you may want to load it again on the NES emulator just to make sure before you submit your modified file. You should see the title screen with the modification you made. Here is an example with the game we modified:
That's neat! Mission accomplished. Well done.
Extra credits
So... you got really into this and you would like to move up in the art? There is so much more that you can do, of course. One of the common hacks that were performed back in the day involved modifying game scores, but one can also modify lives, continues, and other aspects of the game.
If you got this far, you can probably now see where this is all going: a young hacker such as yourself may continue to study the low-level and became good at inspecting programs to see what they are doing---and potentially change them to do other things they were not originally programmed to do. In the context of professional information security work, this is often done to inspect malicious code. This is not an easy job, but it is a pleasurable puzzle like many, many others in computer hacking.
First things first: in order to advance in the art of game hacking, you will have to upgrade your tools! The emulator we used before to load the game is a rough prototype... there are much better ones to use. Especially if you need to monitor the memory of the NES for changes, so you can identify where the score is being kept (or the number of lives... or any other piece of info you want to change in the game). Please observe that this "artisanal approach" is only possible because the NES has a fairly small memory (and because the memory is unprotected), so the limit is your creativity (and the constraints of the actual hardware).
Before you continue, you may want to download and install an emulator called FCEUX (which is available for Mac, Windows and Linux) as it provides all the tools for you will need. Once you have FCEUX installed, you can load the game you want to modify. Let's say it is Pacman (with super low score of 2060, because we are not that good in this game):
After loading your game on FCEUX, you need to click on "Debug" and then "Hex Editor," which will give you the view (in real time) of the state of the memory (with all its changes as the game runs). You want to inspect carefully and search for the value (in hex) for the score that you currently have. You already know how to identify the hex values for different characters and numbers in the game. This is what you did before. Now you want to monitor memory addresses for changes (and make sure they correspond to what you are seeing on the screen). FCEUX allows for you to trigger events when a particular address changes. This is convenient! The emulator also allows you to monitor how many changes took place per register... so it is much easier to identify the addresses you need to change to achieve the results you want to see.
Here is an example of how we modified Pacman in real-time by "poking" 99999 into a particular memory location that holds the score:
We are not that good at Pacman... but we can have a very high score... if we want to!
Here is the additional challenge for this homework: if you modify, in addition to some text in the game, your score or the number of lives in any NES game, you will get an extra point.
Happy game hacking!
Grading
The game hacking challenge (modifying text in the game) is worth 50 points:
- Is the NES file fully functional? Does it run without any errors? (25 points)
- Does your NES file presents the changes that you described in your text file? (25 points)
- For extra credits, does it show modification of other aspects of the game (in addition to text modifications), such as altered scores or number of lives? (10 credits)
Submission Instructions
-
You need to save the NES file you modified and use the naming convention we adopted for this class: lastname_firstname_date.NES. Place the file into the folder (drive) you gave access to Ellen.
-
You also need to write a short text document and place in the same folder: this text must describe which part of the game you changed, because we will not be able to play all the games to figure out where your modifications were made. We would love to... but the summer break is not here yet.
-
Ellen will collect each assignment directly from your drive after it is due (02/13 at 5pm).